In the Shop · August 25, 2026 · 6 min read
CNC Nesting for Cabinet Parts: How We Sequence Cuts to Reduce Waste and Rework
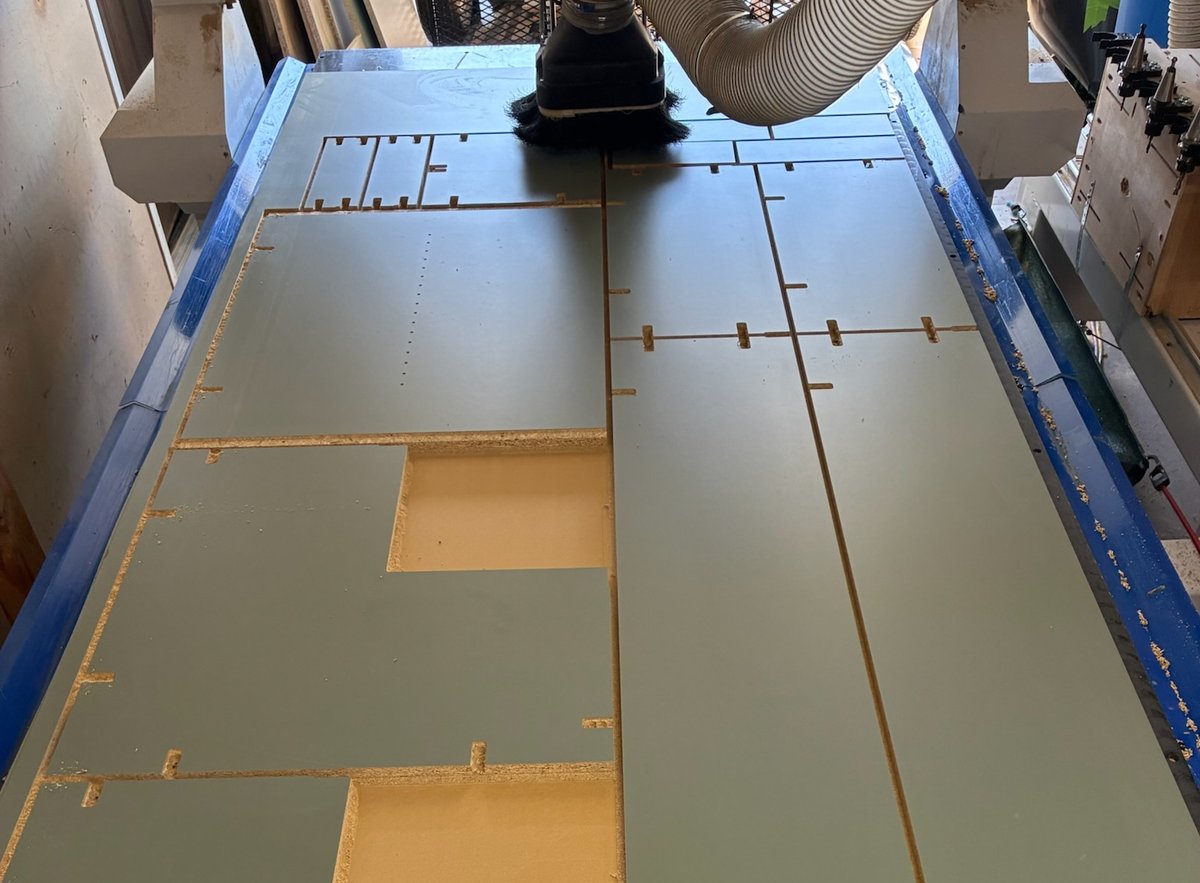
Nesting cabinet parts on a CNC isn't just packing shapes onto a sheet to save material — it's deciding the order those parts get cut, which ones hold their position on the table, and which operations happen before or after a tool change. Get the sequence wrong and you don't just waste sheet goods, you get parts that shift mid-cut, tear-out on show faces, or a nest that looks efficient on screen and falls apart on the table.
We run a 4'x8' 3-axis CNC on an Acorn control, program nests in VCarve, and pull cut lists from Cabinet Pro. Below is how we sequence a nest in practice — written for other shop owners setting up or refining their own nested-base production, not as a software tutorial.
What does "nesting" actually mean for cabinet parts?
Nesting is arranging cabinet parts — sides, bottoms, stretchers, shelves, false fronts — onto a sheet layout that minimizes waste while respecting grain direction, part priority, and how the sheet will be held down during the cut. A nest that only optimizes for material yield and ignores cut order or hold-down strategy will cost you more in rework than it saves in sheet goods.
Two things have to be true for a nest to actually work on the shop floor, not just in the software:
- Grain-sensitive parts are oriented and grouped correctly. On veneered plywood parts — an exposed cabinet end, a matching valance — grain direction across a run has to be consistent, which constrains where those parts can sit on the sheet relative to each other.
- Every part stays fully supported until its last operation. A part that's fully cut free while neighboring parts are still being machined can walk, chatter, or get clipped by the router on a later pass.
How do you sequence the actual cutting, not just the layout?
This is the order we run, and the reasoning behind each step:
- Import the cut list from Cabinet Pro into VCarve. Parts come in with material, thickness, and quantity already assigned from the cabinet design, so nesting starts from a clean list instead of hand-entering dimensions.
- Sort and orient for grain before nesting for yield. Any part with visible grain (exposed ends, some drawer fronts) gets its orientation locked first. Everything else nests around those constraints, not the other way around — nesting purely for yield first and fixing grain after usually forces a re-nest.
- Assign toolpaths by operation type, not by part. Pocket cuts (hinge boring, shelf-pin lines), profile/contour cuts, and drilling get grouped so the machine isn't swapping bits back and forth across the sheet. Fewer tool changes means less time and fewer chances for a Z-height error after a change.
- Set tabs on the final contour pass, sized to the part. Small or narrow parts get more, lighter tabs; large panels get fewer, slightly heavier ones. Tabs are what keep a part registered to the sheet until you're ready to remove it — too few and a part can break free early, too many and you're fighting them at assembly.
- Run interior operations before perimeter cutout. Pockets, dados, and drilling happen while the part is still solidly part of the sheet. The full perimeter cutout — the operation that actually frees the part — runs last.
- Check vacuum hold-down against the nest, don't assume it. A nest that clusters a lot of small parts in one zone can starve hold-down pressure to that section of the table. We check zone coverage against the layout before hitting cycle start, not after a part comes loose mid-cut.
- Pull and label parts immediately off the table. Cabinet parts look generic once they're cut apart — sides, bottoms, and stretchers from different cabinets can look identical. Labeling at the machine, not after a stack builds up, is what keeps kitting accurate downstream.
What mistakes actually cost you time on a nested run?
| Mistake | Why it costs you |
|---|---|
| Nesting for yield before locking grain orientation | Forces a re-nest once you notice grain runs don't match across a run of exposed parts — you're redoing layout work you already finished. |
| Wrong bit for the material | A single-flute or straight bit that's right for plywood will tear out the face on melamine; a bit suited for melamine can leave a rougher edge on veneer plywood. Mismatch it and you're sanding or re-cutting show faces. |
| Too few tabs on large panels | A big panel can flex or lift slightly before the last tab lets go, which shows up as a small step or chatter mark right at the tab location — often on a face that's visible in the finished cabinet. |
| Ignoring hold-down zone coverage | Small parts clustered in one area of the sheet can lose vacuum seal before the neighboring zone's parts are even cut, and a part that shifts mid-operation is a scrapped part, not a fixable one. |
| Batching unlabeled parts | Parts from different cabinets pulled off the table without labels get mixed at the assembly table, and sorting them back out costs more time than labeling would have. |
FAQ
Do you nest by cabinet or by sheet? By sheet. Nesting by individual cabinet wastes material, since most cabinet parts don't fill a sheet on their own — we batch parts from multiple cabinets in a run onto shared sheets, sorted by material and thickness first.
What bit do you use for melamine versus plywood? The short answer is a compression or specifically ground melamine bit for melamine — it's built to shear the brittle outer layer cleanly on both the up-cut and down-cut sides. Plywood, especially veneered plywood with a show face, generally wants a compression bit as well so you're not tearing the face veneer on the exit side of the cut. Bit choice is one of the first things to get right; running the wrong geometry on the wrong material is the single fastest way to turn a good nest into rework.
Do you need a vacuum table for cabinet nesting? For anything beyond very small parts, yes — some form of reliable hold-down is what lets you run interior operations before the part is cut free. Without it you're limited to simpler layouts and more conservative tabbing, which costs you both time and yield.
How much of nesting is software versus shop judgment? The software (VCarve, in our case) handles layout math and toolpath generation, but sequencing decisions — what gets tabbed how, where grain-sensitive parts sit, how zones get grouped for hold-down — come from watching a nest run and seeing what actually causes problems on the table. That's shop experience feeding back into how you set up the next nest, not something the software decides for you.
Planning a commercial fabrication package? View our CNC and casework capabilities or send plans for bid review.